


Wooden Block Image Transfer Christmas Ornament
- thepainteddoorrest
- Nov 12, 2018
- 5 min read


Are you looking for something rustic for your tree this year? These wooden block image transfer Christmas tree ornaments are the perfect touch!
I've put together a step by step tutorial for you so you can create your own rustic tree ornaments this Christmas.
Materials Needed:
1. Wooden blocks (I used 2" cubes)
3. Cottage Paint White
2. Cottage Paint Crimson
3. Cottage Paint Matte Wax
4. Water and a cloth
5. Cottage Paint Gold Gilding Wax
6. Cottage Paint Matte Varnish
7. Eye hook
8. Twine
9. Paint brushes (3 and a small artist brush)
10. Paper cutter or scissors
11. Four laser printed colour images (reversed), sized to 2"x2"
12. Cottage Paint Image Transfer Gel
You may notice some photos are a bit brighter - those are taken in my shop. Photos that seem a little less crisp are taken in my living room in the evening - running your own business is a 24/7 responsibility and
I try to work on smalls in my living room in the evening so that I can still spend time with family, rather than being in the shop all the time.
Step 1: Paint the Block
The images that I have chosen for my ornament have a lot of reds in them, so I chose Crimson to be the base colour for my ornament. Crimson is on the list of Cottage Paint's Winter Palette this year too!
I shook up my little pot of Crimson and painted it onto each side of the block and then set it aside to dry.


Step 2: Wax the Block
Because I want to layer white over the red and distress back to the red, I needed to put a layer of wax over the red paint so that when I distress, it doesn't go right down to the bare wood. I chose Flat Wax for this.
Once all sides were waxed, I set it aside to dry.

Step 3: Paint the Block White
Next, I painted the block in White. Then, you guessed it - I set it aside to dry!

Step 4: Distress the Block
After the block has fully dried, dampen a cloth with water and gently distress the edges of the block so that some of the red shows through and adds dimension to the block.


Step 4: Cut Your Photos to size
Now you are ready to cut out your chosen images. Because my blocks are 2" x 2", I sized my photos to be square and then my husband printed them for me to be 2" x 2". You will need to print them in reverse in order to have them transfer the right way, especially if there is any writing on your image. (Use a laser printer for your images.) I used a scrap book paper cutter to cut them out and ensure that they fit properly.


Step 5: Affix Images with Transfer Gel
Now we are ready to stick the images onto the block. Take your Cottage Paint Image Transfer Gel and apply a generous layer on the image side of your paper. Place your paper image side down onto one side of the block and use and old gift card to smooth out any bubbles or wrinkles. It's important to use a generous amount of the gel as the image will not transfer properly if you use too small of an amount. (I made that mistake a few times and the images rubbed right off while I was rubbing the paper off.) You don't need gobs and gobs, but a nice, thick layer is good.


Step 6: Wait!
Now that your images are stuck on, you need to wait for 24 hours so the gel has time to work on the images. Do some laundry, have dinner, get some beauty sleep - what ever you do, don't touch your block for 24 hours!
Step 7: Remove the Paper
After 24 hours, you can remove the paper from your block. This is a delicate but fun procedure. You need a little water and either a cloth or some paper towel.
Wet your cloth (or paper towel,) and set it one one of your images, allowing the water to dampen the paper. When you lift the cloth, you will be able to see through some of the paper to the image. Gently rub at the paper with your fingers and it will begin to roll off of the block.
You will need to re-wet the paper and keep rubbing as it dries. There will be white fibrous patches where there is still paper left, so it will be easy to see where you need to wet and rub again.
Keep going until all of the paper has been rubbed off. It's ok if some of your images rubs away at the edges! It gives it more of a rustic look. I've had that happen on other ornaments and I love it!
Repeat the paper dampening and rubbing on all 4 images until no paper remains.


Step 8: Seal the Ornament
These ornaments are meant to be hung on a tree, so they won't be touched often, but, I still want to seal mine "just in case." I also make these to sell and you never know what people will do with them, even if you warn them that they are for indoor and light use only, so I'd rather be safe than sorry.
I chose to use Cottage Paint Flat Varnish but you could also use their Wax as well. I didn't want a shiny sealer as these are supposed to look rustic and vintage.


Step 9: Gilding Wax Highlights
I wanted to highlight the edges of my block to give it a little sparkle and interest. I chose Cottage Paint Gold Gilding wax for this. I dipped my finger into the pot and then lightly ran it over the edges and corners of my ornament until I was happy with how much was left behind. I didn't want to cover up the Crimson - I just wanted to add a little bling.
I used a little coaster to set my ornament on while using the gilding wax so that it didn't rub off the ornament onto my table before it had time to dry.


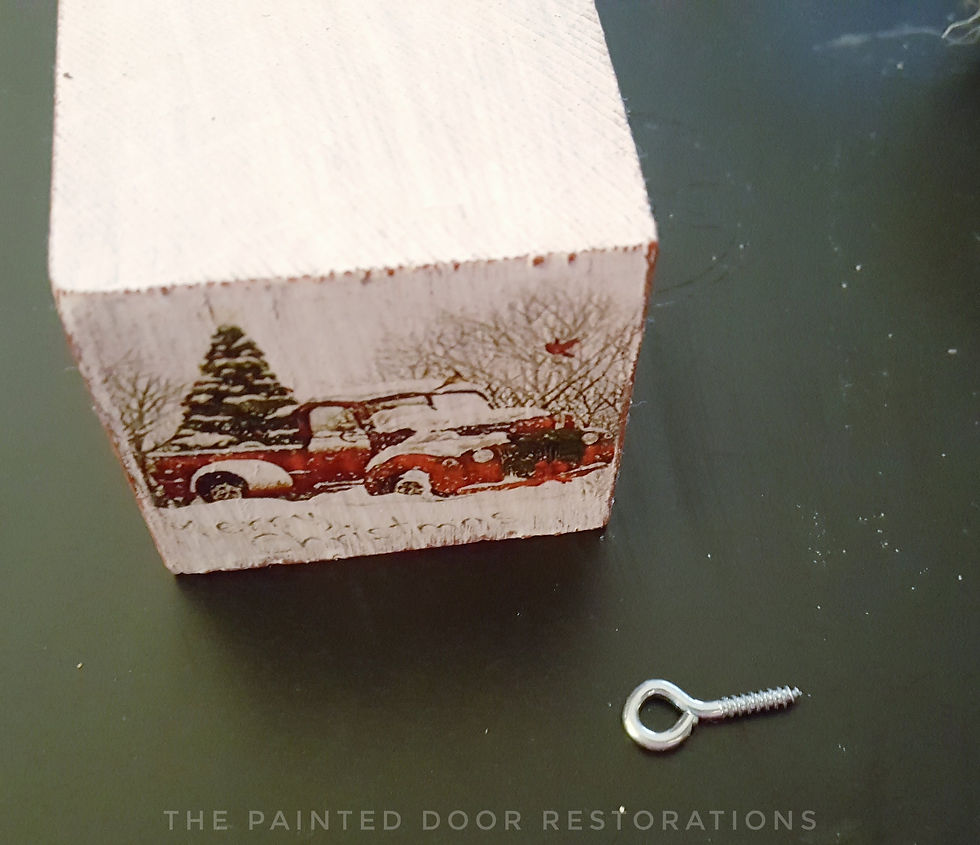
Step 10: Attach your Eye Hook
Now the ornament is ready for the hardware. I took a small eye hook and screwed it by hand into the top, center of my ornament.

Step 11: Attach Twine
Cut a small length of twine for hanging. I didn't measure my twine - I eyeballed it and made it approximately how long most other ornament twine is. (You may want to use a coloured ribbon for your ornament instead.)


You're done!!


I also wanted to post some of Cottage Paint's Colour & Seal colours, because they would also look awesome as base colours for a photo block ornament! Shown here are: Poppy, Lemon, Pomegranate and Hosta.

How cute is that?! It's the perfect little ornament to go on your tree! You can even use photos of you or loved ones and give them as gifts!
You can make one (or many) of these little rustic ornaments in two days - the longest process is the waiting 24 hours for the gel medium to work.
What do you think? Would you have these on your tree? Have you made your own Christmas tree ornaments?
I'd love to hear what you think and see photos of your hand made ornaments.


Comments