


Cottage Paint Colour & Seal Tutorial
- thepainteddoorrest
- Sep 8, 2018
- 5 min read

If you follow me on Face Book and Instagram, you know that I was incredibly lucky (and flattered) to be invited to the Cottage Paint show room in Toronto, by Gail Rogers - the owner of Cottage Paint!
Let's just say, it was one of my favourite days!
Gail was so kind and showed me all of the new products that her company had come out with and I got a little intel' on some products that are currently being created - my lips are sealed but Oh. My. Word!!
She also graciously gave me some products to try out and create with and Colour & Seal was one of them.
I first used Gull (a smokey, ash grey) and Sea Mist (a gorgeous, tropical light blue) on a vanity top that I was working on and posted a quick sneak peek video to my FB and IG pages. The product definitely intrigued me and I couldn't wait to do more with it! You can find that video here:
https://www.facebook.com/thepainteddoorrestorations/videos/2005800912771638/
I've stared making some smalls to add to my shop and one of the products is hand made, wood slat signs. I wanted a "foggy beach" type look for a few of the signs, so I worked with Gull, Sea Mist and White and the more I painted with it, the more hooked I became. I then did a quick IGTV video where I was using Black for some other signs I'm working on. That video can be found here: https://www.facebook.com/thepainteddoorrestorations/videos/287079048771550/
I knew that I had to show you this super cool, versatile product.
Here is the first sign that I made with the "foggy beach" look:
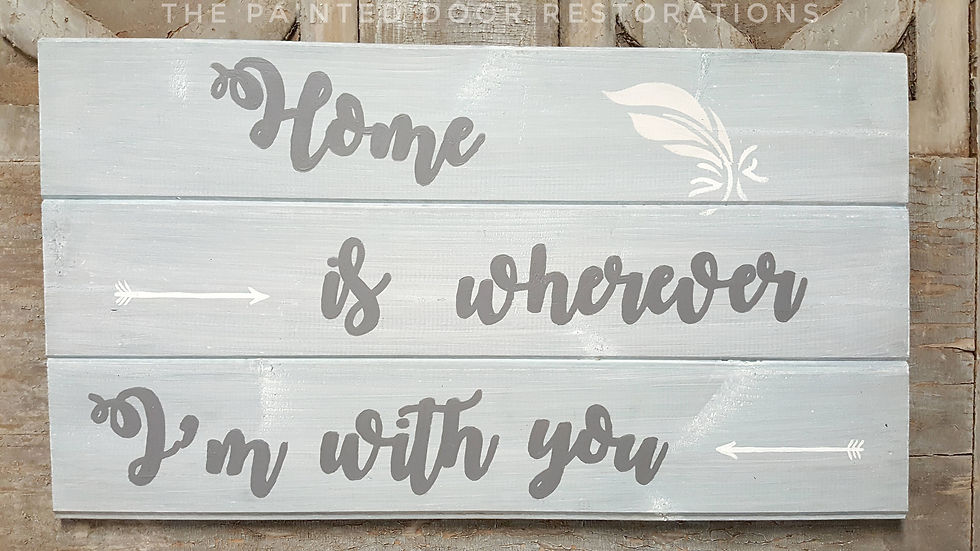
Cottage Paint Colour & Seal is a "semi transparent coating that colours and seals your project all-in-one." Basically, because there is transparency to the product you get to keep the integrity of the wood grain pattern while adding some colour.
Because it is also a sealer, if what you are working on is only meant for light use, (such as the signs that I'm making,) no further sealing is required. If, however, you will be using it on table tops, cupboard doors, etc... you should use Cottage Paint or Urban Paint varnish - depending on if you are using the Cottage Paint or Urban Paint Colour & Seal.
It's a super easy product to use and I wanted to give you a step-by-step tutorial on how you can create the "foggy beach" look that I used for my signs. (I will post the link to the video tutorial here as soon as it gets posted to Face Book next week.)
So here we go - Using Cottage Paint Colour & Seal
Step 1. Prepping your project.
If you will be using Colour & Seal over top of a previously finished piece, you should use Cottage Paint Furniture Clean & Prep to clean your piece. (As I mentioned in my blog post about Colour Image Transfers with Cottage Paint Gel Medium, you should 'paint' the cleaner on with a brush rather than spraying it. This ensures a more even coverage without over spray.) Lightly sanding with 220g sand paper is then recommended to provide a bit of "tooth" for the product to cling to, but don't sand down to the bare wood. Wipe your piece clean of sanding dust before using Colour & Seal.
If you are using Colour & Seal on a raw piece of wood that's never been touched, no cleaning is needed.
Since my signs are unfinished, Knotty Pine, I didn't use any cleaner.

2. Putting down your first coat.
For the "foggy beach" look, I began with Gull. After shaking the jar well, I used one of my Cottage Paint brushes and simply brushed the product on in the direction of the wood grain. The product brushes on very nicely and is easily moved around. I kept brushing the product on until I was happy with the coverage and then allowed the first coat to dry. The jar says drying time is 6 to 8 hours, so I left it alone for a while.


3. Laying down your second coat.
I wanted the grey to show through the Sea Mist and White, so I put down a second coat of Gull, making sure to shake the jar again before use. Once the first coat was completely dry, I got out my Cottage Paint brush again, and repeated step 2, brushing Gull on in the direction of the wood grain. I then left it alone to dry.

4. The next colour.
I chose Sea Mist next, as it's a bright, tropical blue and is the perfect colour for a beachy look! Once my two coats of Gull were completely dry, I shook up my jar of Sea Mist, dipped my brush in and painted on a coat in the direction of the grain. When I was happy with the coverage, I left it to dry.


5. Our final colour.
To complete my look, I used White. After my first 3 coats of the other colours were dry, I shook up my jar and painted on one coat of the white in the direction of the wood grain and, you guessed it, left it to dry.


6. Sealing your project.
Since I was working on a sign, I didn't really need to seal it any further, since it's not meant to be touched constantly. However, I did add a hand painted quote as well as some arrows and a feather and I wanted to make sure that the paint portion of the sign was sealed well, so I chose to use Cottage Paint Flat Varnish.
Since Colour & Seal is a sealer, if your project is going to be something that is light traffic, you don't need additional sealer. If you think that it's possible your project is going to be handled a lot, I definitely suggest using one of Cottage Paint's Varnishes. (If you are using an Urban Paint Colour & Seal, then I would suggest an Urban Paint Varnish.)


Et voila! 6 simple steps to getting a fun, "foggy beach" look using Cottage Paint Colour & Seal. If you get the chance to check out my video tutorial, you will see some layering of other colours on sample boards while I explained how to use the product, as well as the same tutorial in video format.
This is such a versatile product and as I've said many times, the more I use it, the more I love it! I've even used it under some Cottage Paint paint and am going to do a wet distress to reveal some of the Colour & Seal beneath. I've done a video tutorial on Wet Distressing with Cottage Paint. You can find that here:
https://www.facebook.com/thepainteddoorrestorations/videos/vl.292159831311879/1970974186246254/?type=1
I will, at some point, do a blog post tutorial on wet distressing so you will have step by step photos.
If you have the opportunity to try this product, and any other Cottage Paint products, I'd LOVE to hear your thoughts and experiences and I would love to see photos of your projects. I can promise you, this product won't disappoint!


Comments